TL;DR - liblab can generate dev containers for your SDKs so you can start using them instantly. See our docs for details.
As software developers, our productivity is constantly increasing - with better tools, and even AI powered coding to allow us to deliver faster, and focus on building better solutions to more complex problems. The downside of this is the initial setup - getting our tools configured and our environments ready can be a big time sink. Anyone who has ever joined a new company with poor on-boarding documentation can attest to this! Days or even weeks trying to find the right versions of tools, and getting them configured correctly. It's almost a rite of passage for a new developer to re-write the onboarding document to add all the new tools and setup needed to get started.
This is something we see at liblab - our customers generate SDKs to increase their productivity, or the productivity of their customers, but to validate each SDK means setting up environments to run TypeScript, Java, Python. C#, Go and more. Although this is a one time cost, we decided to reduce this setup time so you can test out your generated SDKs in seconds - using dev containers!
What is a dev container?
A development container, or dev container, is a pre-configured isolated development environment that you can run locally or in the cloud, inside a container. Containers come with all the tools you need pre-installed, your code, and any configuration you need to get started, such as building or installing your code. They were designed to solve the setup problem as well as reliably deployments - set up your container once for a particular project, and everyone can share that setup. If the setup changes, the dev container changes, and everyone gets the new setup. It's also the closest thing we have to a "works on my machine" solution - if it works in the dev container, it will work for everyone. Literally like shipping your machine to your customers!
Running dev containers
Dev containers can be run locally through your favorite IDE, such as Visual Studio Code or IntelliJ, as long as you have container tooling installed such as Docker. You can also run containers in the cloud, using things like GitHub codespaces.
For example, you can create a dev container for Python development using one of your projects, that is based upon a defined version of Linux, has Python 3.11 installed, is configured to use the Python Visual Studio Code extension, and will install the required pip packages from your projects requirements.txt file when the container is created. As soon as you open this in Visual Studio Code, it will spin up the container, make sure the Python extension is installed, install your pip packages and you are instantly ready to start coding.
Dev containers isolation
Because dev containers are just that - containers, they run isolated from your local machine, so you don't need to worry about conflicting tool versions, or other conflicts. What is installed in the container just lives in the container, and what you have locally is not available inside that container. This means you can have multiple dev containers for different projects, and they won't conflict with each other. For example - you could have Python 3.11 installed locally, have one project in a dev container using Python 3.10 and another for legacy work using Python 2! Each will be isolated and have no idea about the other.
How are dev containers set up?
A dev container is defined by having a folder called .devcontainer in the root of your project. This folder contains a devcontainer.json file, which defines the container image to use, and any configuration you need to run your code. This devcontainer.json file can reference a pre-defined environment, such as Python, or NodeJS with TypeScript, or you can define your own environment using a Dockerfile.
.
└── .devcontainer/
    └── devcontainer.json
    └── Dockerfile
In the devcontainer.json file, you can also define any extensions you want to install in your IDE. By having the configuration in one or more files, these dev containers are instantly reproducible - check them into source code control and when someone else clones your repo and opens the folder, they will instantly get exactly the same environment.
You can read more on configuring dev containers in the dev container documentation.
How can I use dev containers with my generated SDK?
liblab can be configured to create the dev container configuration files for your SDK. This is done by an option in your configuration file:
{
  ...
  "customizations": {
    "devContainer": true
  },
  ...
}
When you run the SDK generation process using liblab build, the generated SDK folder will come with the .devcontainer folder all ready to go. The container will be configured to not only install the relevant language tooling, but your SDK will also be installed ready to be used.
Use your dev container to test your SDK
To test your SDK in a dev container, make sure you have Docker desktop (or another Docker compliant container tool) running, and open the SDK folder for your language of choice in Visual Studio Code. You will be prompted to open the folder in a container, select Reopen in Container and your dev container will be created. This may take a few minutes the first time, but subsequent times will be much faster.

Let's use the dev container created with a Python SDK as an example. In this example, I'm going to use the Python SDK for our llama store API sample. Open this SDK in VS Code, or even open it in a codespace in GitHub.
Once the container is opened, a script is run to install the SDK dependencies, build the Python SDK as a wheel, then install this locally. There's no need to use a virtual environment, as the container is isolated from your local machine, so the installed wheel is only available in the container.

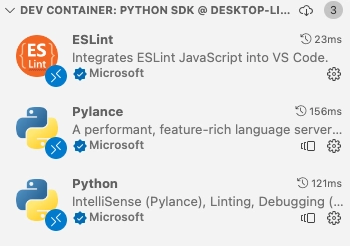
As well as installing the SDK, the dev container will also install PyLance, the Python extension for Visual Studio Code, so VS Code will be fully configured for Python development. You can see this in the extensions panel:

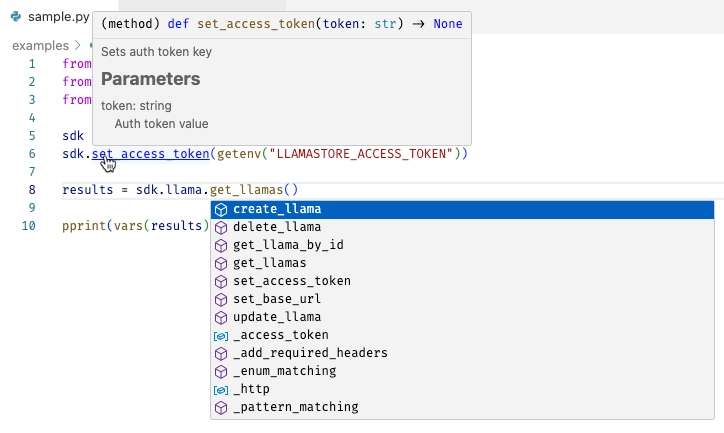
This is now available from any Python code you want to run. Every SDK comes with a simple example - liblab takes the default get method and creates a small sample using this, and you can find this in the examples/sample.py file. If you open this file, you will see that VS Code knows about the SDK, with intellisense, documentation and code completion available:

It's now much easier to play with the SDK and build out code samples or test projects to validate your SDK before you publish it.
Conclusion
Dev containers are a great way to test out a new SDK. liblab can generate the dev container configuration for your SDK, so you can get started instantly. To find out more, check out our documentation.
Before you go, are you ready to transform your API strategy with automated SDK generation? Explore how liblab can help you generate consistent, high-quality SDKs across 6 programming languages from your OpenAPI specification. Your developers—and your budget—will thank you.Build an SDK For Any API
