Control and SDK repos
A control repo is a repository that contains the source of truth for everything you need to generate an SDK with liblab, and controls your SDK generation when using liblab in a CI/CD pipeline. SDK repos are where you generated SDKs live.
Control repo
A control repo contains at the minimum your liblab config file. It can also contain your API spec if you are using a local file, and code for hooks or custom plan modifiers. It can also contain Actions to trigger SDK generation in a CI/CD pipeline.
.
├── .github
│   └── workflows
├── spec.json
├── liblab.config.json
├── customPlanModifiers
│   ├── attributes
│   └── resources
└── hooks
    ├── go
    ├── csharp
    ├── java
    ├── python
    ├── terraform
    └── typescript
Create a control repo
liblab provides a template repo that you can use to get started. This contains a basic config file that you can configure, an example spec, and GitHub Actions to update your SDKs when your spec changes, or when liblab releases an update.
Select the button below to create a new control repo using this template.
Regenerate SDKs using GitHub Actions
One of the powerful features of liblab is the ability to regenerate your SDKs when your spec changes. This can be done using GitHub Actions to give a hands off experience - once your spec changes, liblab will re-generate your SDK and raise pull requests for you to review in your SDK repos.
In your control repo, you will need 2 Actions - one to check for updates to your spec, config file, or hooks code, and one to check for liblab updates. If you create your control repo using the template repo mentioned above then these Actions will already be set up for you.
Configure secrets
These Actions need 2 Actions secrets set - LIBLAB_TOKEN and LIBLAB_GITHUB_TOKEN.
LIBLAB_TOKENis a liblab access token created usingliblab token createLIBLAB_GITHUB_TOKENis your GitHub token. You can find more information on how to create a GitHub token with the correct permissions in our pull request documentation
Check for updates to your spec
The control template repo contains a GitHub Action that monitors the spec file in the repo, hooks code, as well as the liblab config file, for changes. If any of these files change, the SDK is regenerated and a pull request is raised in the SDK repos.
The GitHub Action has the following code:
name: Generate SDKs using liblab

on:
  workflow_call:
  workflow_dispatch:
  push:
    branches:
      - main
    paths:
      - 'liblab.config.json'
      - 'spec.json'
      - 'hooks/**'
      - 'customPlanModifiers/**'
jobs:
  build-and-pr:
    name: Generate SDKs and create PRs
    runs-on: ubuntu-latest
    if: github.run_number != 1
    env:
      LIBLAB_CI: true
      LIBLAB_TOKEN: ${{ secrets.LIBLAB_TOKEN }}
      LIBLAB_GITHUB_TOKEN: ${{ secrets.LIBLAB_GITHUB_TOKEN }}
    steps:
      - name: Check if secrets are set
        run: |
          if [[ -n "${{ secrets.LIBLAB_TOKEN }}" && -n "${{ secrets.LIBLAB_GITHUB_TOKEN }}" ]]; then
            echo "Secrets are set, proceeding with the workflow"
          else
            echo "Error: Secrets LIBLAB_TOKEN and LIBLAB_GITHUB_TOKEN are required, see /docs/tutorials/ci-cd/integrate-with-github-actions/#create-tokens"
            echo "::error::Secrets LIBLAB_TOKEN and LIBLAB_GITHUB_TOKEN are required, see /docs/tutorials/ci-cd/integrate-with-github-actions/#create-tokens"
            exit 1
          fi
      - name: Checkout
        uses: actions/checkout@v4
      - name: Setup Node.js environment
        uses: actions/setup-node@v4
        with:
          node-version: '20'
      - name: Install liblab
        run: npm install -g liblab
      - name: Start Build
        run: liblab build --yes
      - name: Create PRs to GitHub repos
        run: liblab pr
This Action watches for changes to the config file, spec and hooks code on the main branch. If you use a different file structure, a different branch name, or a different name for your spec file, you can update the push event.
Once a change is detected, it will verify that you have the secrets configured correctly, then build the SDK, and create a pull request in your SDK repos.
Check for liblab updates
When liblab releases an update, you can use a GitHub Action to detect this and regenerate your SDKs. These updates may include bug fixes and other improvements to the generated SDKs, but will not create any breaking changes in the generated SDK.
This Action is included in the control template repo, and uses an SDK Updates Action published by liblab on the GitHub marketplace.
The GitHub Action has the following code:
name: Latest liblab updates

on:
  workflow_dispatch:
  schedule:
    - cron: '0 11 * * *' # 11am UTC corresponds to 5am CST

jobs:
  generate-sdks-and-publish-prs:
    name: Generate SDKs and publish PRs
    runs-on: ubuntu-latest
    steps:
      - uses: actions/checkout@v4
      - name: Generate SDKs and publish PRs
        uses: liblaber/sdk-[email protected]
        with:
          liblab_token: ${{ secrets.LIBLAB_TOKEN }}
          liblab_github_token: ${{ secrets.LIBLAB_GITHUB_TOKEN }}
This code runs at 11am UTC every day, and checks for updates to liblab. If an update is detected, it will regenerate your SDKs and raise a pull request in your SDK repos. You can change the schedule to suit your needs by updating the cron schedule.
SDK repos
SDK repos are where your generated SDKs live, one per SDK language. From here you can publish your SDKs to a package manager if required.
Your liblab config file should be configured to point to these SDK repos to allow pull requests to be raised by your control repo. This is done using the githubRepoName config file option for each SDK language.
You can use GitHub Actions to publish your SDKs to a package manager when you release a new version.
Create an SDK repo
liblab provides template repos to generate SDK repos that have GitHub Actions that publish to the relevant package manager when you create a release.
If you create an SDK repo manually, make sure to create the default branch. If you see this error when creating a PR using the liblab CLI or GitHub Action:
Default branch: main does not exists in the repository
Then check that you have created the main branch in your repo.
Configure the SDK repos
To publish to a package manager, you will need to configure the GitHub Actions in your SDK repos, including setting Actions secrets.
- TypeScript
- Python
- C#
- Java
- Go
- PHP
To publish to npm, you will need an npm access token. You can generate a new access token from your user settings on npm.
-
Select the Access Tokens tab, drop down the Generate New Token button, then select Granular Access Token.

-
Fill in all the required details for the token such as the name and expiry.
-
Make sure that this token has read and write permission to publish packages. If the package already exists, you can scope this token to just that package, otherwise this token needs read and write for all packages.
-
Once the token has been created, make a copy of it.
-
In your TypeScript SDK repo, add this token as an Actions secret named
NPM_TOKEN.
You can learn more about creating npm tokens in the npm access tokens documentation.
To publish to PyPI you will need an API token. You can generate a new API token from your account settings page on PyPI.
-
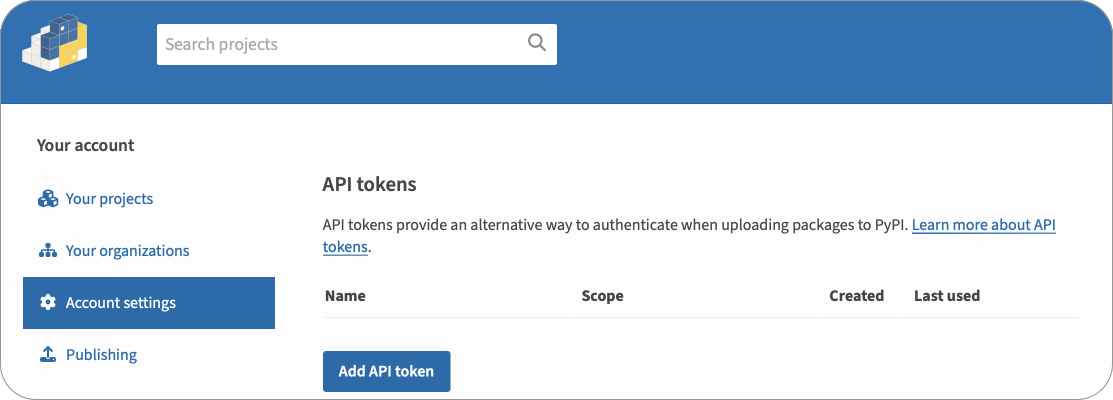
Select Account settings, scroll to the API tokens section, then select the Add API token button.
-
Give the token a name.
-
Select the scope for the token. If the package already exists, select that package for the scope, otherwise select Entire account (all packages).
-
Select the Create token button.
-
Once the token has been created, make a copy of it.
-
In your Python SDK repo, add this token as an Actions secret named
PYPI_TOKEN.
You can learn more about creating PyPI tokens in the PyPI API tokens documentation.
To publish to NuGet, you will need a NuGet API key. You can generate an API key from your account on NuGet.
-
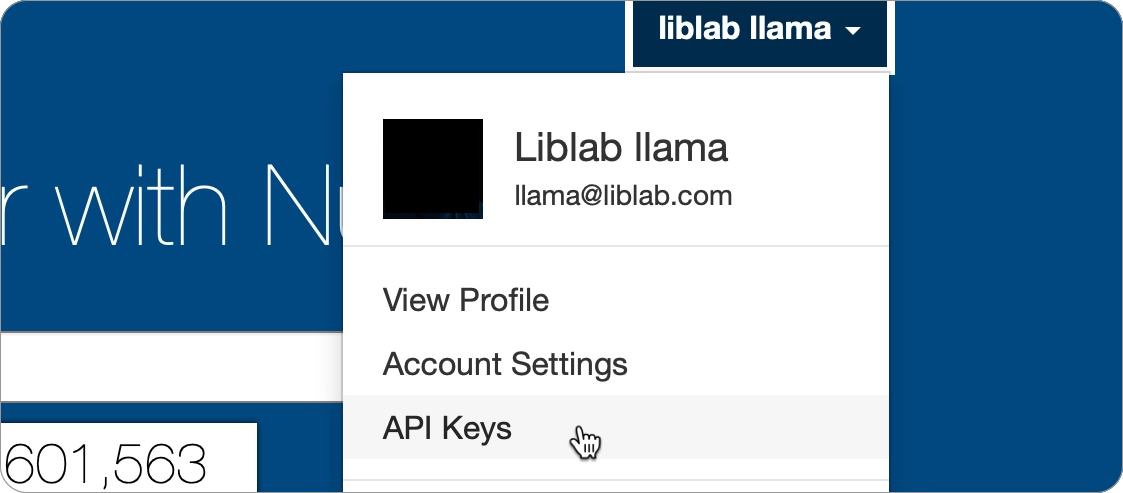
Select your name on the top right, then select the API Keys.
-
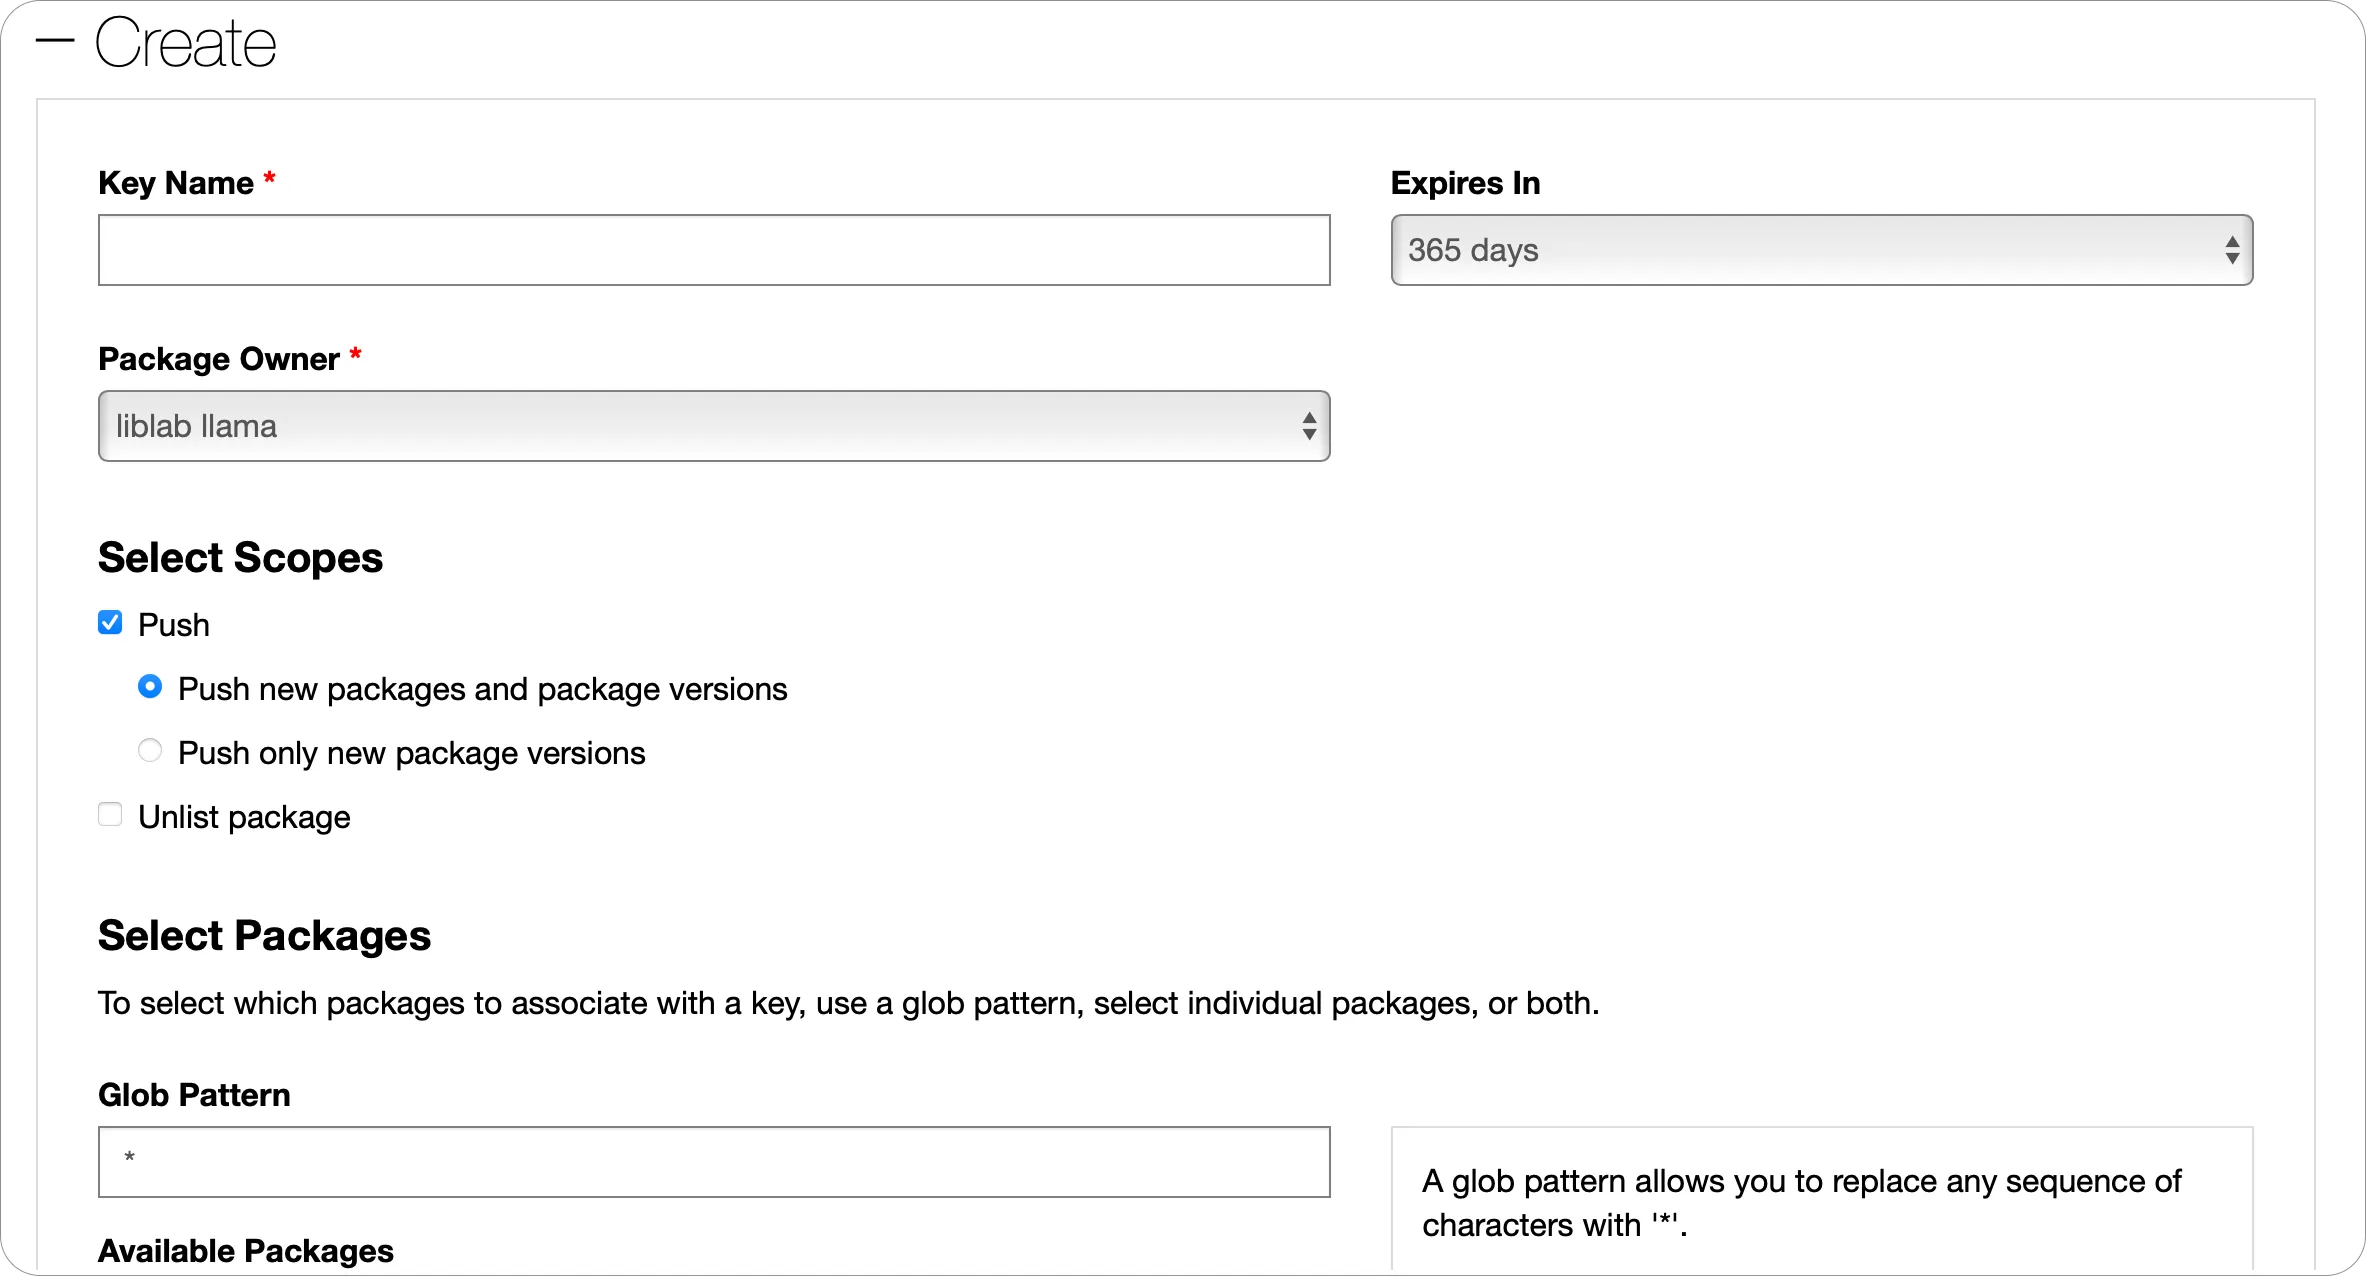
From the API Keys page, expand the Create section.
-
Give your API Key a name, and set the required expiry and package owner.
-
Set the scope for this API Key.
- If the package already exists, select Push and Push only new package versions. Then in the Select Packages section, select the package you want to publish updates for.
- If the package does not exist, select Push and Push new packages and package versions, then in the Glob pattern, put
*. This will allow you to push a new package.
-
Select the Create button.
-
Once the API Key has been created, expand the Manage section, and make a copy of it using the Copy button.

-
In your C# SDK repo, add this token as an Actions secret named
NUGET_TOKEN.
You can learn more about creating NuGet API Keys in the NuGet API Keys documentation.
To publish to the Maven Central Repository, you will need Maven credentials and a GPG key with a passphrase to sign your artifacts.
As of March 12th, 2024, the Central Portal became the default publishing server for Maven packages. At the moment, we do not support automatic publishing through the Legacy OSSRH.
Central Portal Setup
The Central Portal Account Documentation explains how to create an account. An account is required for claiming namespaces, generating credentials and managing package deployments.
Namespace Registration
Your namespace is the crucial prerequisite for publishing a package to the Central Repository as it is the groupId of the package. The Central Repository Namespace Documentation provides detailed instructions for claiming a namespace.
The namespace verification process is not instant.
- For own domain namespaces (e.g.
com.liblab), an additional step is required, which involves setting up the verification key as a DNS record in order for the domain name to be verified by the Central Repository. - For GitHub namespaces (namespace in the form of
io.github.githuborgname), though, verification process is automatic if the user is registered using the GitHub SSO.
Once your namespace is verified, the next step is to generate your Maven credentials.
Generate Maven Credentials
-
Head to the Central Portal at central.sonatype.com, and either create an account, or sign in.
-
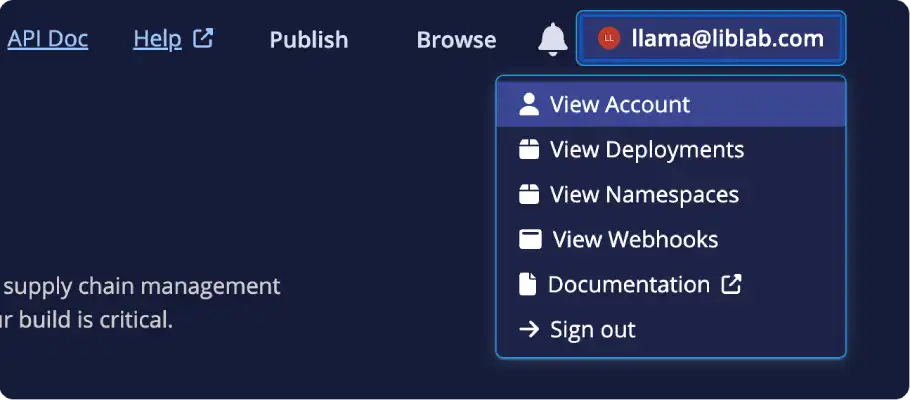
Select your email on the top right, then select View Account.
-
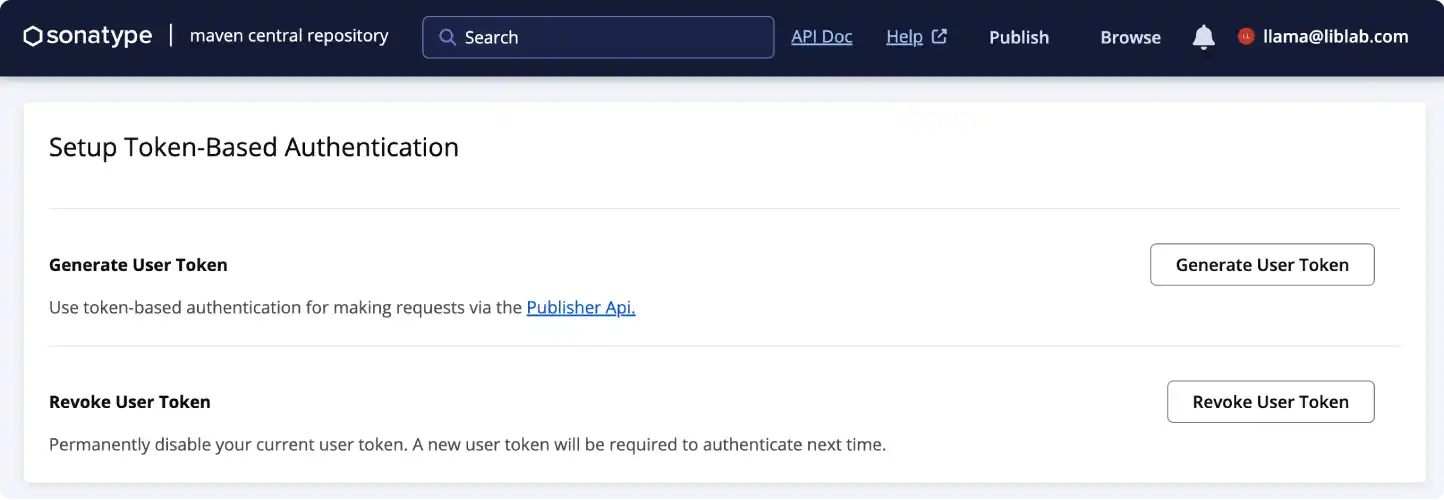
From the Account page, select the Generate User Token button.
-
When the dialog appears, confirm that you want to generate a new token, and credentials will be generated.
-
In your Java SDK repo, add value of the
Usernamefield as a new GitHub Actions secret calledMAVEN_USERNAMEand the value of thePasswordfield as a secret calledMAVEN_PASSWORD.
You can learn more about creating Central Portal credentials in the Central Portal Documentation.
Generate GPG Key
The Central Repository requires all artifacts to be signed with PGP, such as using a GPG key. You will need to generate your own key pair, distribute it to the key server and obtain the private key, then set this as an other GitHub Actions secret.
The following steps will guide you through the process of creating a GPG key using GnuPG. If you already have a GPG key, you can skip this step. If you want to use a different tool to generate your GPG key, you will need to follow the relevant documentation for that tool.
-
Install GnuPG if you don't have it installed.
-
Initialize the key generation prompt by running:
Terminalgpg --gen-key -
Follow the instructions from
gpg, and choose a passphrase -
Once the key is generated, you will need to get the key id. This is the 40-character hex string on the second line of the
pubsection in the output from generating the key:Terminalpublic and secret key created and signed.
pub ed25519 2024-05-07 [SC] [expires: 2027-05-07]
AB1C2D3456EF78A90BC12D34567890123456789E
uid Exciting Soda <[email protected]>
sub cv25519 2024-05-07 [E] [expires: 2027-05-07] -
Send the key to your key server, such as
openpgpby running the following command:Terminalgpg --keyserver keys.openpgp.org --send-keys <key-id>Replace
<key-id>with the key id you obtained in the previous step. -
Get the private key using the following command:
Terminalgpg --export-secret-keys --armour <key-id>Replace
<key-id>with your key id.Terminal➜ ~ gpg --export-secret-keys --armour AB1C2D3456EF78A90BC12D34567890123456789E
-----BEGIN PGP PRIVATE KEY BLOCK-----
mDMEXEcE6RYJKwYBBAHaRw8BAQdArjWwk3FAqyiFbFBKT4TzXcVBqPTB3gmzlC/U
b7O1u120JkFsaWNlIExvdmVsYWNlIDxhbGljZUBvcGVucGdwLmV4YW1wbGU+iJAE
ExYIADgCGwMFCwkIBwIGFQoJCAsCBBYCAwECHgECF4AWIQTrhbtfozp14V6UTmPy
MVUMT0fjjgUCXaWfOgAKCRDyMVUMT0fjjukrAPoDnHBSogOmsHOsd9qGsiZpgRnO
dypvbm+QtXZqth9rvwD9HcDC0tC+PHAsO7OTh1S1TC9RiJsvawAfCPaQZoed8gK4
OARcRwTpEgorBgEEAZdVAQUBAQdAQv8GIa2rSTzgqbXCpDDYMiKRVitCsy203x3s
E9+eviIDAQgHiHgEGBYIACAWIQTrhbtfozp14V6UTmPyMVUMT0fjjgUCXEcE6QIb
DAAKCRDyMVUMT0fjjlnQAQDFHUs6TIcxrNTtEZFjUFm1M0PJ1Dng/cDW4xN80fsn
0QEA22Kr7VkCjeAEC08VSTeV+QFsmz55/lntWkwYWhmvOgE=
=iIGO
-----END PGP PRIVATE KEY BLOCK----- -
Copy the output from this command, and add it to a new GitHub Actions secret called
GPG_PRIVATE_KEY. -
Create another GitHub Actions secret called
GPG_PASSPHRASE, and set this to the passphrase you chose when generating the key.
Go package management differs from many other languages in that it does not require API tokens for publishing to the Go Packages repository. Unlike some ecosystems where API tokens are necessary to interact with package registries, Go relies on its module proxy system, which integrates seamlessly with GitHub.
As explained in the official publishing tutorial on Go's website, packages are published to the Go Packages repository by tagging a release on GitHub. The Create a release in GitHub section later in this tutorial provides a step-by-step guide on how to create a release in GitHub which will automatically trigger the publishing of the package to the Go Packages repository. Upon creating a release, it should not take longer than one hour for the package to become available on the Go Packages repository.
To publish your PHP SDK to Packagist, you will first need an account on Packagist and your Packagist API Token.
-
Create an Account on Packagist or login to Packagist using your GitHub account.
-
Obtain your Packagist API Token from your profile settings

-
In your PHP SDK repo, add this token as an Actions secret named
PACKAGIST_TOKENand set the secretPACKAGIST_USERNAMEto your packagist username as it appears on your profile.
-
Submit your package
- Log in to your Packagist account.
- Go to the Submit tab.
- Enter the URL of your SDK's GitHub repository.
- Select Check to validate the repository and Submit to add your package to Packagist.