Connect Claude to an MCP Server
This guide explains how to connect an MCP server to Claude, enabling you to interact with your API using natural language.
Interactive Configuration Generator
🛠️ Configuration Generator
Select your authentication type and fill in your details to generate a personalized configuration:
Generated Configuration
{
  "mcpServers": {
    "my-mcp-server": {
      "command": "npx",
      "args": [
        "mcp-remote",
        "https://your-mcp-server.com",
        "--header",
        "API_Key: ${API_KEY}"
      ],
      "env": {
        "API_KEY": "your-api-key-here"
      }
    }
  }
}
Claude Code CLI Installation
For Claude Code (CLI), you can add the MCP server using the Claude CLI command:
claude mcp add --transport http --scope local my-mcp-server https://your-mcp-server.com --env API_KEY="your-api-key-here" --header "API_Key: ${API_KEY}"
💡 Claude Code CLI Scope Options:
--scope local(default): Available only to you in the current project--scope project: Shared with everyone in the project via .mcp.json file--scope user: Available to you across all projects
Note: This CLI command is for Claude Code (CLI), not Claude Desktop. For Claude Desktop, use the JSON configuration above.
Before You Start
Before you connect Claude to your MCP server, ensure you have:
- Access to Claude (Claude Desktop).
- One of the following:
- A local MCP server generated with liblab CLI.
- A publicly deployed MCP server URL generated on your liblab dashboard.
To learn more about how MCP works, visit the MCP Concept page.
Connect Claude to a Remote MCP Server
Use this method if your MCP server is deployed and accessible over the internet through an URL. If you generated your MCP server using the liblab hosting service, use this option.
-
Open Claude Desktop.
-
In the settings, go to Developer and click Edit Config. This will open the
claude_desktop_config.jsonfile.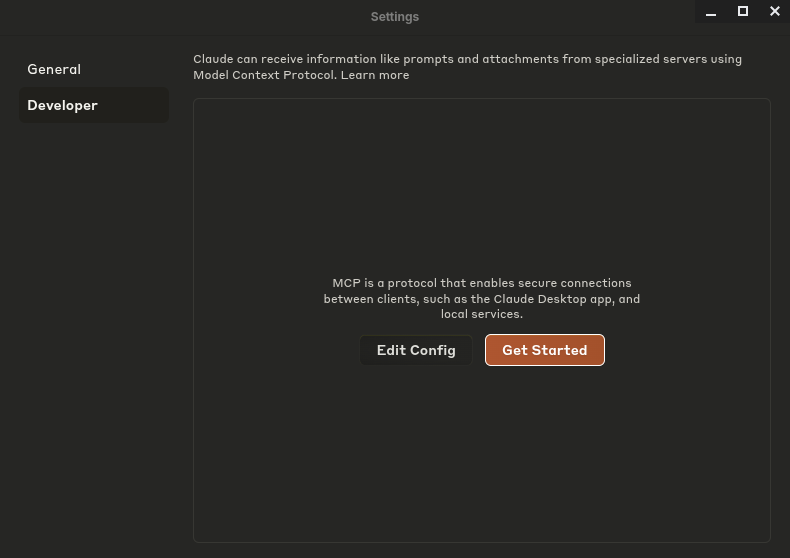
-
Use the interactive configurator above to generate your configuration with proper authentication. Copy the generated JSON configuration and paste it into your
claude_desktop_config.jsonfile.For basic setups without authentication, you can use:
claude_desktop_config.json{
"mcpServers": {
"liblab": {
"command": "npx",
"args": [
"mcp-remote",
"https://mcp.liblab.io/liblab"
]
}
}
} -
Save the file, close and reopen Claude Desktop to reload the configuration.
-
Start a new chat and test your API integration.
Connect Claude to a Local MCP Server
Use this method if you’re running the MCP server locally, generated from an OpenAPI spec using liblab CLI.
If you haven’t yet generated your MCP server, follow the Generate an MCP Server with liblab CLI guide.
After generating the server using the liblab CLI, navigate to the output folder and run the setup script:
cd output/mcp
npm run setup
Now, you need to update Claude's configuration:
-
Open Claude Desktop and go to Settings > Developer > Edit Config.
-
Modify
claude_desktop_config.jsonto point to the local MCP server file path:claude_desktop_config.json{
"mcpServers": {
"your-local-api": {
"command": "node",
"args": [
"<path-to-liblab-generated-mcp-server>/output/mcp/dist/index.js"
],
"env": {
"YOUR_API_KEY": "<your-api-key>"
}
}
}
}MCP server authenticationMake sure to use the correct environment variable name expected by your API.
-
Save the file and restart Claude Desktop.
-
Open a new conversation and test the integration.
Next Steps
To continue working with MCP and Claude, check out the following resources:
-
How to generate an MCP server with liblab CLI
MCP server authenticationDepending on your MCP server implementation, the environment variable key may differ (e.g.,
EXA_API_KEY,CATS_API_TOKEN, etc.).