Connect VSCode to an MCP Server
This guide explains how to connect an MCP server to VSCode with Copilot, allowing you to interact with your API using natural language directly within the Copilot interface.
Interactive Configuration Generator
🛠️ Configuration Generator
Select your authentication type and fill in your details to generate a personalized configuration:
💡 Choose your configuration approach:
- Workspace: Creates
.vscode/mcp.jsonwith secure credential prompts (recommended) - User: Adds to global
settings.jsonwith manual credential setup
📝 Note: With workspace configuration, VSCode will securely prompt for credentials when the MCP server starts. You don't need to enter them here.
Generated Configuration
{
  "inputs": [
    {
      "type": "promptString",
      "id": "my-mcp-server-api-key",
      "description": "my-mcp-server API Key",
      "password": true
    }
  ],
  "servers": {
    "my-mcp-server": {
      "type": "http",
      "url": "https://your-mcp-server.com",
      "headers": {
        "API_Key": "${input:my-mcp-server-api-key}"
      },
      "env": {
        "API_KEY": "${input:my-mcp-server-api-key}"
      }
    }
  }
}
Before You Start
Before connecting VSCode with Copilot to your MCP server, make sure you have:
- The VSCode editor installed.
- The GitHub Copilot Chat extension installed and enabled in VSCode.
- One of the following:
- A local MCP server generated with liblab CLI.
- A publicly deployed MCP server URL generated on your liblab dashboard.
To learn more about how MCP works, visit the MCP Concept page.
Connect VSCode to a Remote MCP Server
Use this method if your MCP server is deployed and accessible over the internet through an URL. If you generated your MCP server using the liblab hosting service, use this option.
-
Open VSCode.
-
Navigate to File > Preferences > Settings (or press
Ctrl + ,). -
Use the interactive configurator above to generate your configuration with proper authentication. The configurator supports both workspace configuration (recommended for secure credential prompts) and user configuration (for direct credential storage).
-
Copy the generated configuration and either:
- For workspace config: Create a
.vscode/mcp.jsonfile in your project root - For user config: Add to your global
settings.jsonfile
- For workspace config: Create a
-
A Start button will appear for your MCP server configuration. Click it to launch the server.

-
To test the integration, open a new Copilot Chat window (
Ctrl+Alt+I) and select Agent Mode. Start chatting to interact with your API. Copilot will detect if you’re using a registered tool from your MCP server and prompt you for permission to execute it.
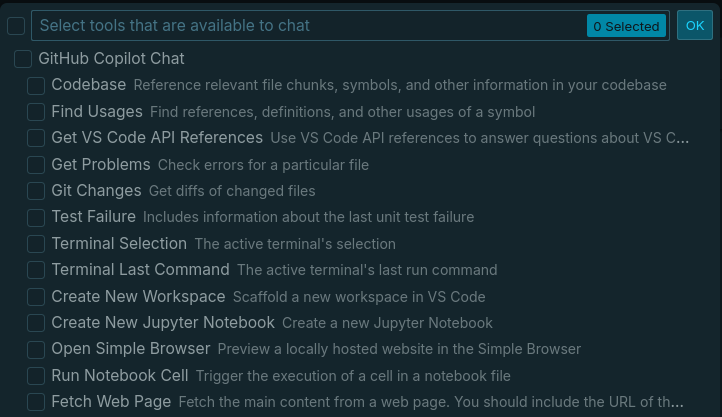
Enable MCP Tools in VSCode using Copilot
To enable MCP tools, open a chat in Agent Mode and click the Select Tools icon. VSCode will show the MCP servers and their available tools. Use the checkboxes to enable the ones you want.
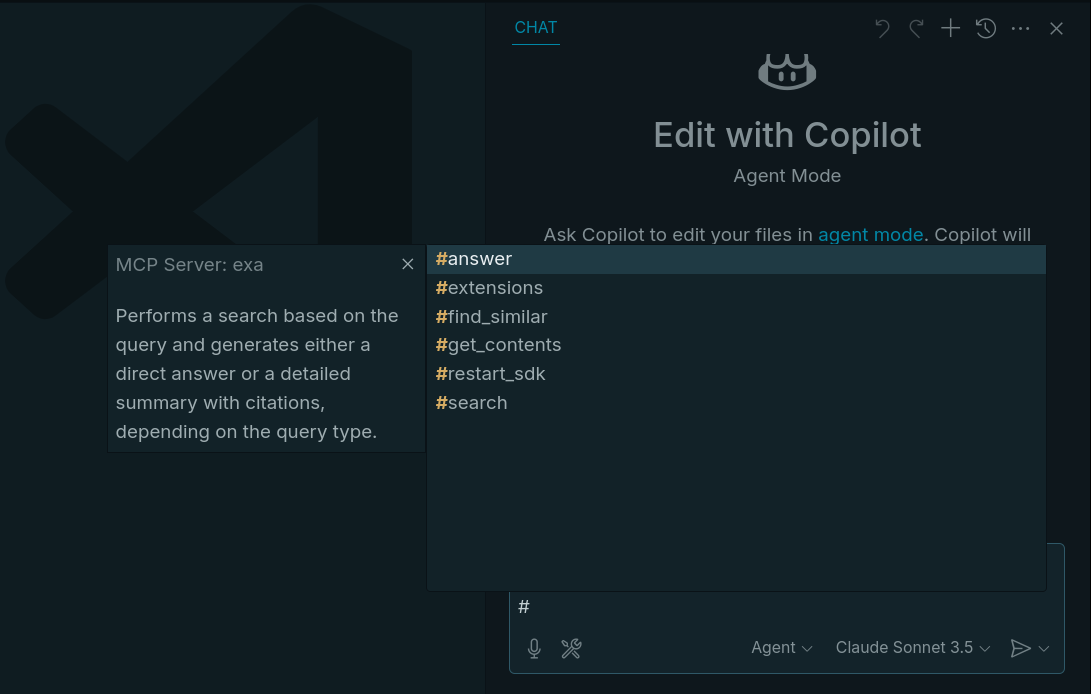
Using MCP tools
You can specify the MCP tool you want to use in your chat by typing # followed by the tool name. If you don't know the tools available, you can type # and Copilot will suggest the tools from your MCP server and provide a brief description for each one.
Connect VSCode to a Local MCP Server
Use this method if you're running the MCP server locally, generated from an OpenAPI spec using liblab.
If you haven’t yet generated your MCP server, follow the Generate an MCP Server with liblab guide.
After generating the server using the liblab CLI, navigate to the output folder and run:
cd output/mcp
npm run setup
Now, you need to update VSCode's settings:
-
Open VSCode.
-
Go to File > Preferences > Settings (or press
Ctrl + ,). -
Search for
MCP. Click Edit in settings.json under the Mcp: Model Context Protocol server configurations setting. -
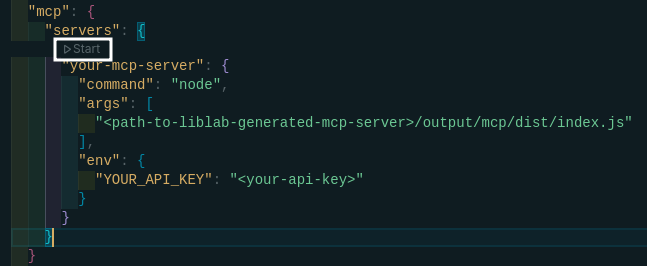
VSCode will open the
settings.jsonfile. You can add the following configuration for your local MCP server. Replace the placeholder URL and environment variables with your actual values, then save the file.settings.json...
"mcp": {
"servers": {
"your-mcp-server": {
"command": "node",
"args": [
"<path-to-liblab-generated-mcp-server>/output/mcp/dist/index.js"
],
"env": {
"YOUR_API_KEY": "<your-api-key>"
}
}
}
}
...MCP server authenticationMake sure to use the correct environment variable name expected by your API.
-
Once the config is saved, a Start button will appear next to your local MCP server. Click it to run the server.
-
Once the server is running, open a new Copilot Chat (
Ctrl+Alt+I), enable Agent Mode, and start interacting. Copilot will identify available MCP tools and ask for permission before executing them.
Next Steps
To continue working with MCP and Copilot in VSCode, explore the following: