Automating API spec fetching from Postman using GitHub Actions
This tutorial shows you how to set up a GitHub Action to automatically fetch a Postman collection and upload it to your repository using the Postman API. By automating this process, you can keep your Postman collections synced with your CI/CD pipeline and ensure that your SDKs are always up-to-date with the latest API spec, without manual exports from Postman.
Ensure that you have:
- A GitHub repository to store the Postman collection.
- A Postman account and access to the Postman API.
- The Postman collection ID of your API spec.
- Your Postman API key for authentication.
Set up the GitHub Action
The first step is to set up the GitHub Action to fetch the Postman collection and save it as a JSON file in your repository. You'll need to create a new GitHub Action in your repository:
-
Create a
.github/actions/fetch-postman-collection-actiondirectory in your repository. -
Add a new YAML file named
action.ymlunder the.github/actions/fetch-postman-collection-actiondirectory. -
Copy and paste the following code into
action.yml:action.ymlname: 'Fetch Postman Collection'
description: 'Fetch a Postman collection and save it as a JSON file, then validate it.'
inputs:
postman_collection_id:
description: 'The Postman collection ID to fetch.'
required: true
postman_api_key:
description: 'Your Postman API key.'
required: true
output_file:
description: 'The file where the Postman collection will be saved.'
required: false
default: 'collection.json'
runs:
using: 'composite'
steps:
- name: Fetch Postman Collection
shell: bash
run: |
curl -s -H "X-API-Key: ${{ inputs.postman_api_key }}" \
"https://api.postman.com/collections/${{ inputs.postman_collection_id }}" \
| jq '.collection' > ${{ inputs.output_file }}
echo "saved_file=${{ inputs.output_file }}" >> $GITHUB_OUTPUT
- name: Validate JSON
shell: bash
run: |
jq empty ${{ inputs.output_file }} || (echo "Invalid JSON file" && exit 1)
- name: Commit and push changes
shell: bash
run: |
git config user.name "github-actions[bot]"
git config user.email "41898282+github-actions[bot]@users.noreply.github.com"
git fetch origin main
git merge origin/main --no-edit || echo "No conflicts to resolve."
git add ${{ inputs.output_file }}
git commit -m "Add updated Postman collection"
git push
This GitHub Action fetches a Postman collection using the Postman API, saves it as a JSON file, and validates its format. If the collection is valid, it commits and pushes the updated file to the repository, ensuring the Postman collection in the repo stays up-to-date automatically.
Use the GitHub Action in your workflow
To use the action, you can trigger it as part of your CI/CD workflow by calling it from your main workflow YAML file.
To trigger the action, reference it in your main workflow YAML file. If you don’t have an existing workflow file, you can create a new one and add the following code snippet to .github/workflows/main.yml:
name: API Spec Fetch and Sync

on:
  push:
    branches:
      - main
  pull_request:
    branches:
      - main
  workflow_dispatch: # Allows manual triggering of the workflow

jobs:
  fetch_postman_collection:
    runs-on: ubuntu-latest

    permissions:
      contents: write # This grants write access to the repository contents

    steps:
      - name: Checkout repository
        uses: actions/checkout@v2

      - name: Call Fetch Postman Collection Action
        uses: ./.github/actions/fetch-postman-collection-action
        with:
          postman_collection_id: ${{ secrets.POSTMAN_COLLECTION_ID }}
          postman_api_key: ${{ secrets.POSTMAN_API_KEY }}
          output_file: 'postman-collection.json'
        env:
          GITHUB_TOKEN: ${{ secrets.GITHUB_TOKEN }}
To ensure the workflow will work, make sure that the path used for uses: ./.github/actions/fetch-postman-collection-action is correct. In addition, you still need to add POSTMAN_COLLECTION_ID and POSTMAN_API_KEY to your secrets before using the action.
You can set output_file, the output file name, where the Postman collection will be saved. The default is collection.json, but you can change this to any desired file name and edit the path.
Generate the Postman API Key
You need a Postman API Key to use the GitHub Action created previously:
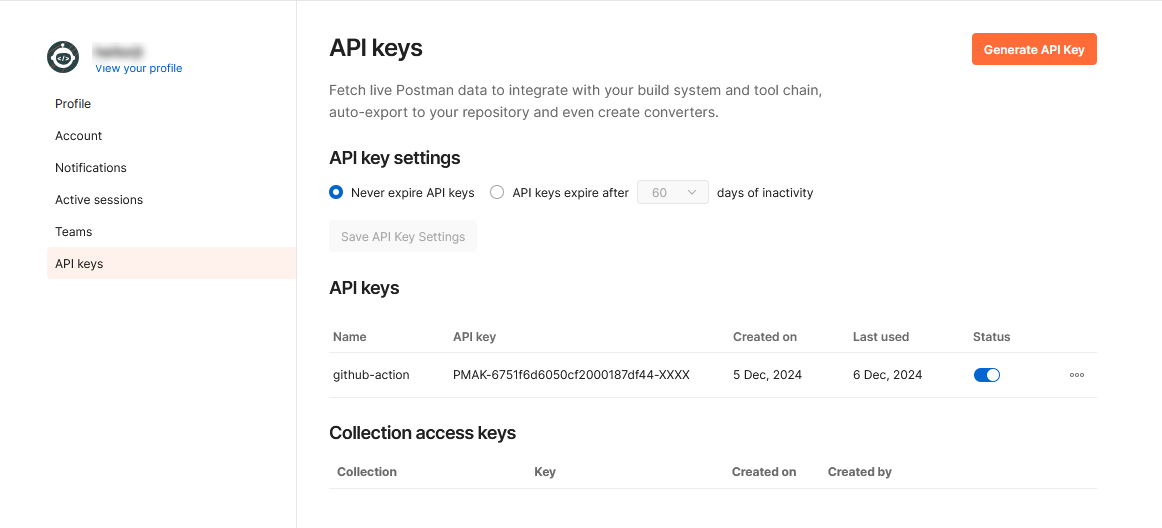
- Access the API Keys section using the Postman account that owns the collection.
- Click Generate API Key.
- Name your key and click Generate API Key.
- Copy the API Key and save it in a secure place. This is the only time you'll see it unencrypted.
- After creating the API Key, change the API Key settings, select the option Never expire API keys. This will ensure you'll not need to repeat this process in the future.

Get the collection id
The GitHub Action needs the Postman collection id to know which collection to get the information from.
To retrieve the collection id:
- Make a request to the Postman API endpoint to list all collections linked to your account. Replace the
<your_api_key>by the API Key you just generated.
curl -X GET "https://api.getpostman.com/collections?apikey=<your_api_key>"
- You will receive an array with all collections linked to your account. Identify the collection you want to use and copy its
id. The following snippet presents an example of the response you can expect.
{
  "collections": [
    {
      "id": "30107d04-5793-4bdd-9449-601be46cf6b2",
      "name": "Collection Name",
      "owner": "28471659",
      "createdAt": "2024-08-19T12:35:18.000Z",
      "updatedAt": "2024-08-19T12:35:18.000Z",
      "uid": "28471659-30107d04-5793-4bdd-9449-601be46ef6a2",
      "isPublic": false
    },
    {
      "id": "640c6fca-bb4b-4959-b23a-0b1278cf056b",
      "name": "Collection Name",
      "owner": "21397186",
      "createdAt": "2022-09-05T22:54:41.000Z",
      "updatedAt": "2022-09-16T18:27:32.000Z",
      "uid": "21397186-640c6fca-bb4b-4959-b23c-0b1278ef056b",
      "isPublic": false
    }
  ]
}
Store secrets in GitHub
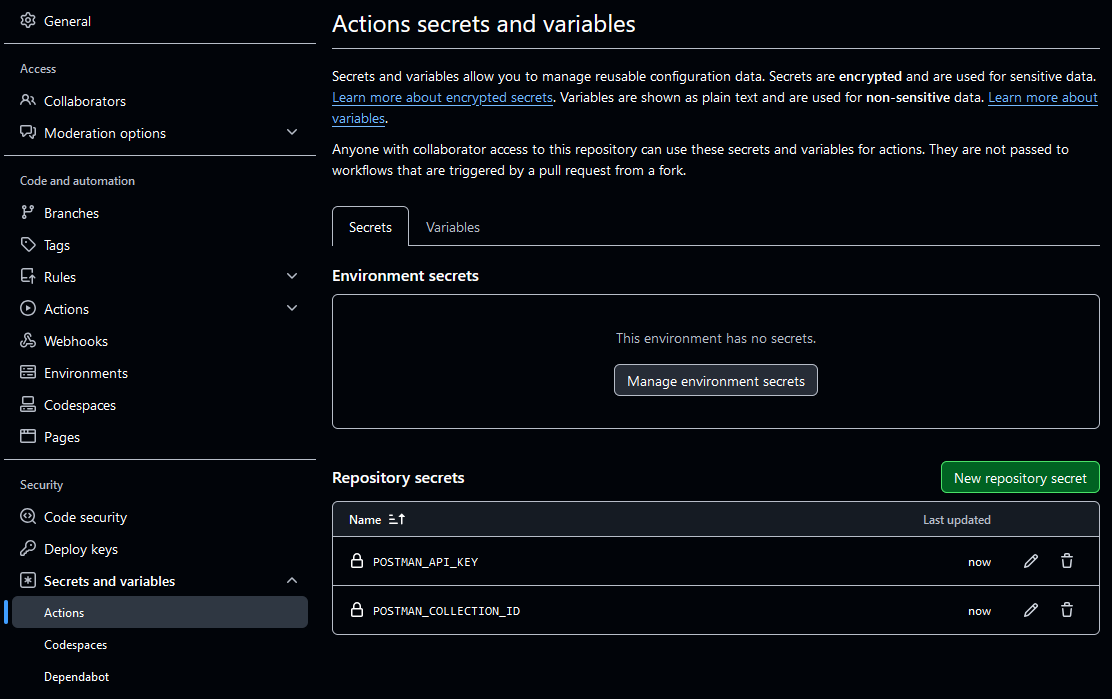
For security reasons, you should not hardcode your Postman API key or collection ID in the workflow. Instead, use GitHub Secrets to store these values securely.
- Go to your GitHub repository's Settings.
- Navigate to Secrets and variables > Actions.
- Add the following secrets:
POSTMAN_COLLECTION_ID: The ID of the Postman collection.POSTMAN_API_KEY: Your Postman API key.

Triggering the workflow
Once everything is configured, the GitHub Action will trigger on a push or pull_request event to the main branch, or any branch you specify. The action will:
- Fetch the Postman collection from the Postman API.
- Save it as a JSON file.
- Validate the JSON file to ensure it is well-formed.
- Commit the updated file to the repository.
After triggering the workflow, access your GitHub repository's Actions tab to check the action's current status.
Verifying the process
Once the workflow is complete, you should see the updated Postman collection file in your repository. You can now use it in your CI/CD pipeline to regenerate SDKs as needed.
