ReadMe.io API docs integration
This guide will walk you through the steps to integrate liblab’s enhanced API specification with ReadMe.io. With this integration, you can publish OpenAPI documentation enhanced with SDK code samples generated by liblab on ReadMe, providing developers with dynamic, up-to-date API documentation.
liblab automates the process of generating SDKs and enhancing your OpenAPI spec with SDK code examples in multiple programming languages, simplifying the creation of comprehensive API documentation.
ReadMe doesn't support TypeScript rendering. For this reason, Node.js is used as an alternative.
Prerequisites
Before you start, ensure you have:
- A liblab account.
- The liblab CLI installed.
- A ReadMe.io account.
- A GitHub repository to host your project.
- A GitHub token with the necessary permissions (read/write access to repositories).
1. Create a ReadMe Project
Before integrating liblab with ReadMe, you need to set up a ReadMe project. Follow these steps to create one:
- Sign in or create an account at ReadMe.
- On your dashboard, click + New Project.
- Enter a Project Name and Subdomain.
- Click Create to finalize the project setup.
2. Create a GitHub Repository
To integrate liblab and ReadMe, you'll need a GitHub repository. The repository will serve two purposes:
- ReadMe will get the repository's content every time the main branch is updated to update the documentation.
- After creating new SDKs and the enhanced OpenAPI spec, liblab will push the OpenAPI file to the repository.
Follow these steps:
- Create a new GitHub repository.
- Clone the repository to your machine.
- Add your API spec to the repository. For this tutorial, we're using the PetStore OpenAPI spec.
Here's what the repository structure should look like:
/petstore-documentation
├── petstore.json
3. Add your ReadMe API Key
To enable ReadMe to track your repository content, you have to add the ReadMe API Key as a GitHub secret. Follow the steps below:
-
Access your ReadMe project and navigate to Configuration > API Keys. 2.
-
Copy the existing API Key.

-
Add a new secrete named README_API_KEY to your GitHub repository using the ReadMe API Key. Access the GitHub tutorial on how to create secrets for a repository if you need help with the process.

4. Upload the API Spec to ReadMe
To enable ReadMe to sync your OpenAPI spec from the repository and automatically update your documentation, you first need to upload your API spec manually. This step is required to obtain the API_DEFINITION_ID, which identifies the OpenAPI spec for future updates and re-syncs.
You can use the ReadMe CLI to obtain the API_DEFINITION_ID. If you prefer this option, access the ReadMe documentation.
Follow these steps to upload your OpenAPI spec and retrieve the API_DEFINITION_ID:
- Access your ReadMe project dashboard.
- In the sidebar, select API Reference.
- Click Add your first API.
- Choose API Import, then select file.
- Drag and drop your OpenAPI spec file from your repository into the designated area. For this tutorial, we uploaded
petstore.json. - Toggle the Visualization option to on to make the API documentation publicly available.
- Click Dismiss to complete the process.
Once the upload is complete, you’ll find the API_DEFINITION_ID in the API Reference settings of your ReadMe project dashboard. This ID will be required when configuringequired when configuring the ReadMe workflow for future synchronization.
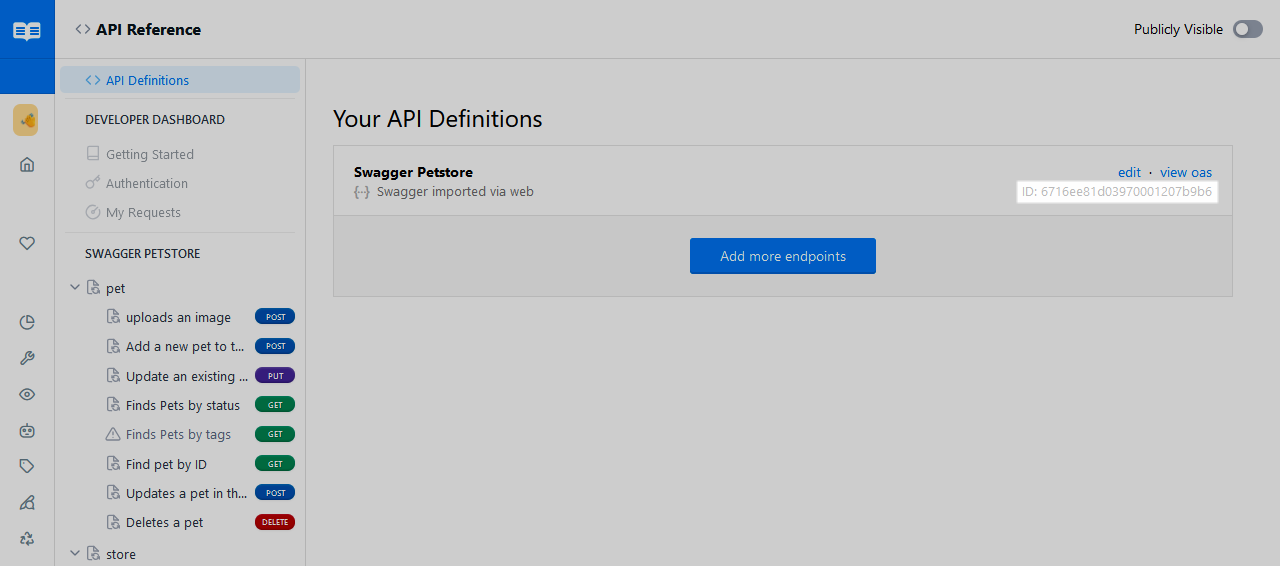
Follow these steps to access your API documentation portal:
- Hover your mouse over the ReadMe sidebar to expand it.
- Click on your project name in the sidebar. You will be redirected to your project's documentation portal.
- In the portal, click the API Reference tab to open the API documentation.
The GIF below shows how to access your API documentation.
5. Set up a ReadMe Workflow
Now, you'll configure a GitHub Action to sync your repository with ReadMe. This setup ensures that whenever new content is pushed to the main branch, the workflow will notify ReadMe that your OpenAPI spec has been updated, prompting the automatic update of your API documentation.
Follow these steps to create the GitHub Action:
-
Create a new GitHub Actions workflow file in the
.github/workflowsdirectory of your repository. For this tutorial, we'll name the filerdme-openapi.yml. -
Add the following content to the workflow file. Be sure to replace
<API_DEFINITION_ID>with your actualAPI_DEFINITION_ID, and update the<path-to-openapi-file.json>to point to your OpenAPI file..github/workflowsname: ReadMe GitHub Action 🦉
on:
push:
branches:
- main
jobs:
rdme-openapi:
runs-on: ubuntu-latest
steps:
- name: Check out repo 📚
uses: actions/checkout@v4
- name: Run `openapi` command 🚀
uses: readmeio/rdme@v8
with:
rdme: openapi <./path-to-openapi-file.json> --key=${{ secrets.README_API_KEY }} --id=<API_DEFINITION_ID>Keep the workflow up-to-dateThe workflow uses
@v8for the ReadMe GitHub Action. It’s recommended to set up Dependabot to keep the action updated automatically.noteFor additional guidence on how to configure the ReadMe workflow, access ReadMe documentation.
-
Save the workflow file and push your local changes to GitHub.
The structure of your repository should now look like this:
/petstore-documentation
├── petstore.json
├── .github/
│   └── workflows/
│       └── rdme-openapi.yml
When you push the changes, GitHub Actions will automatically trigger the ReadMe workflow, using your OpenAPI spec to generate and update your ReadMe API documentation.
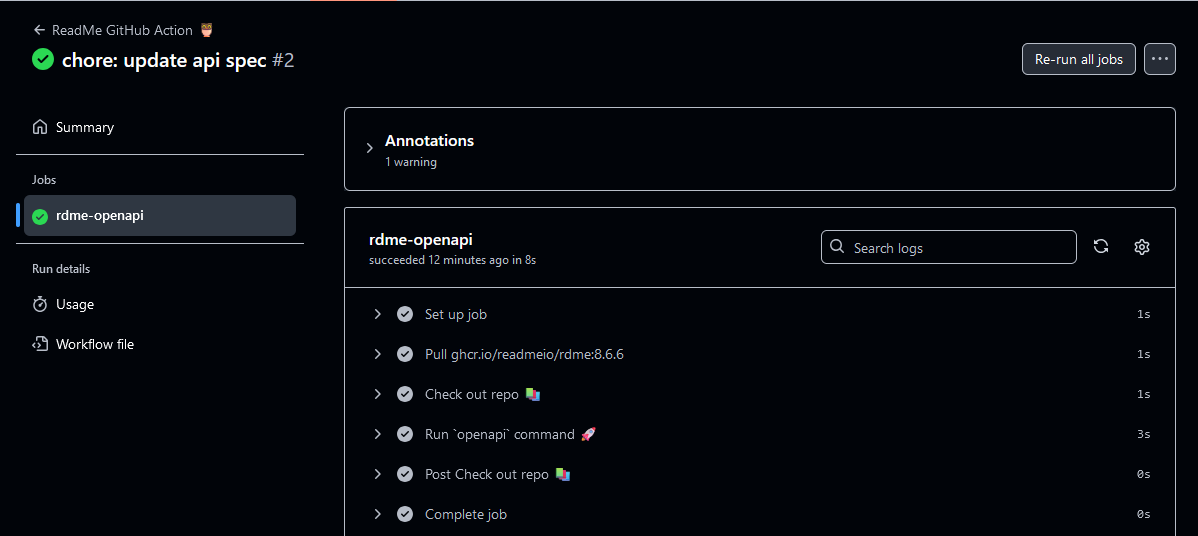
Access your ReadMe project to see the new API documentation available. The example below shows documentation generated using the PetStore API spec.
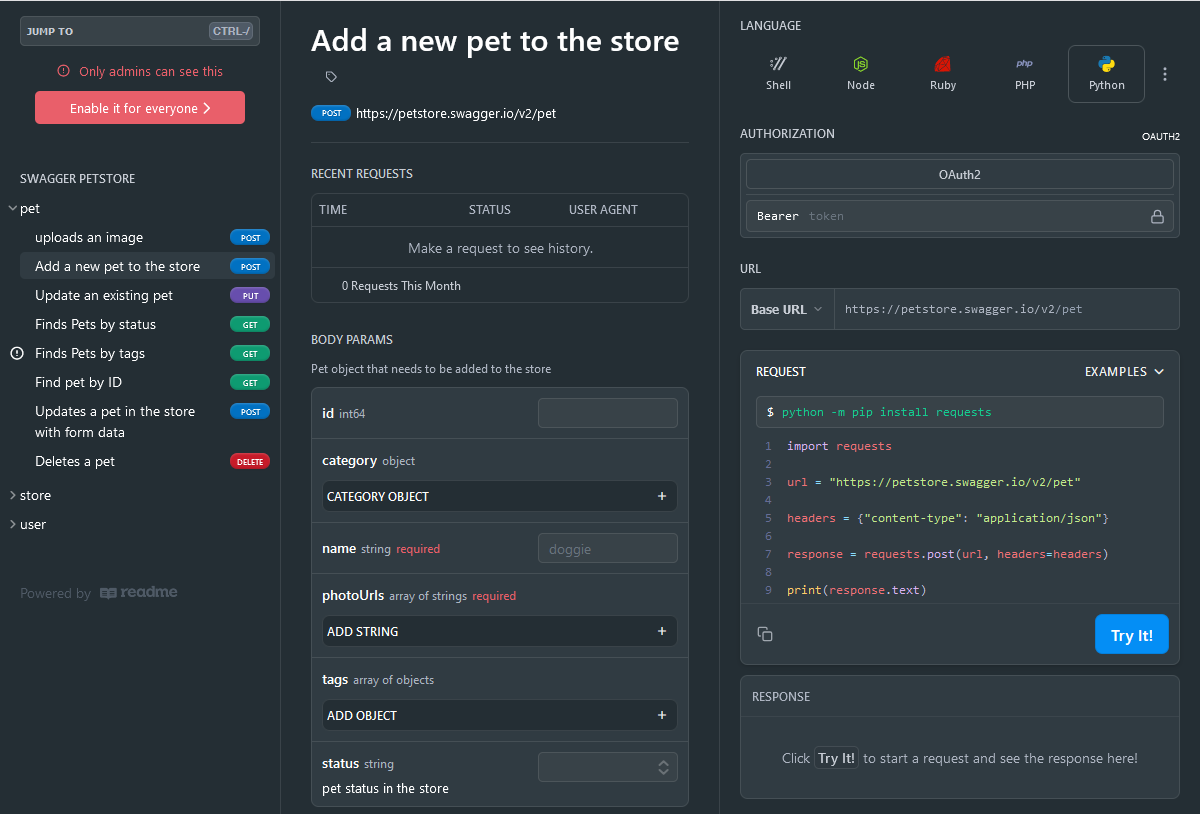
6. Create a GitHub Token
After creating the repository, generate a GitHub token to enable liblab to create pull requests (PRs) in your repository. This token ensures your repository's OpenAPI spec is updated automatically whenever you use liblab.
Follow these steps to create the token:
- Navigate to your GitHub profile and click Settings.
- In the sidebar, click Developer Settings.
- At the Developer Settings page, select Personal access tokens > Fine-grained tokens.
- Click Generate new token.
- Name the token LIBLAB_GITHUB_TOKEN and set its expiration. For production documentation, choose No expiration.
- Select Only select repositories under Repository Access and choose the repository you created in Step 2.
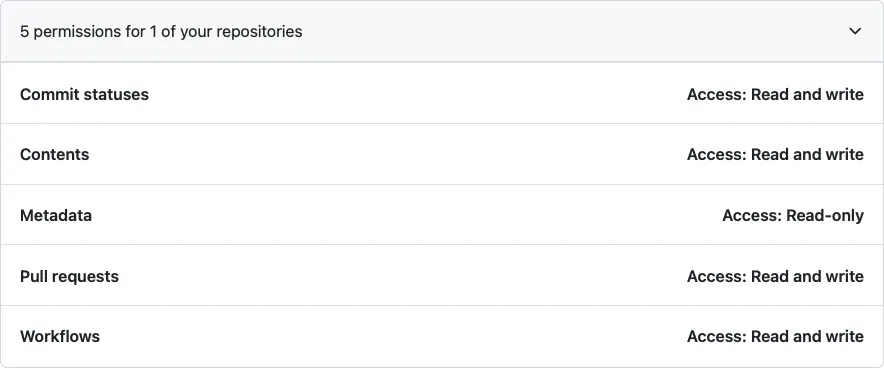
- Set the following repository permissions:
- Commit Statuses: Read/Write.
- Contents: Read/Write.
- Metadata: Read.
- Pull Requests: Read/Write.
- Workflows: Read/Write.
- Click Generate token.
For further information and detailed guidance on creating the token, access the Pull request creation documentation page.
Once created, copy the LIBLAB_GITHUB_TOKEN and save it in a secure location for use in the upcoming steps. For more details on how the LIBLAB_GITHUB_TOKEN will be used to create PRs, access the liblab documentation.
7. Configure the liblab Project
Now, you'll integrate liblab to automatically update the OpenAPI specification in the repository created in Step 2.
liblab generates SDKs based on your OpenAPI spec and enhances the spec by adding elements like code snippets and SDK examples. These enhancements improve the developer experience by providing clear documentation. Integrating liblab makes your API documentation more dynamic, maintaining accuracy and consistency across every update with minimal manual effort.
Access the API and SDK documentation overview to learn more about how liblab enhances the OpenAPI spec.
7.1 Create the liblab Project
In a new repository, initialize a liblab project with the following command:
liblab init
A new liblab.config.json file will be created in the directory. Update it to use the same OpenAPI spec as in Step 2:
{
  "sdkName": "petstore",
  "apiName": "petstore",
  "specFilePath": "https://raw.githubusercontent.com/OAI/OpenAPI-Specification/main/examples/v3.0/petstore.json"
}
By default, when you initialize a liblab project, it's set to generate SDKs for the following programming languages:
- C#
- Go
- Python
- TypeScript
You can customize the list of programming languages as needed. However, remember that the languages you specify in your liblab configuration file will be used to create the enhanced OpenAPI spec. This enhanced spec will include your OpenAPI definition along with SDK code snippets for each selected language. ReadMe will later use the enhanced OpenAPI spec to generate a new version of your API documentation.
7.2 Configure the GitHub Organization
To ensure liblab pushes changes to the correct repository after enhancing the API, you need to update the liblab.config.json file with the organization or username that owns the repository created in Step 2. Add the following to your liblab.config.json file:
{
  "publishing": {
    "githubOrg": "<your-organization-name>"
  }
}
If you own the repository from Step 2, use your GitHub username as the githubOrg.
7.3 Configure Integration Setting
In addition to specifying the organization, you must configure the integration to generate the API documentation. This information should be placed within the integrations.enhancedApiSpec object. Update the liblab.config.json file with the following information:
provider: The API documentation provider, which for this tutorial isreadmeIO.githubRepoName: The GitHub repository where the API documentation project is hosted. Use the repository created in Step 2.targetBranch: The base branch from which liblab will create a new branch. This new branch will be used to open the pull request. By default, themainbranch is used as the base.readmeIO.openapiPath(Optional): This object allows you to specify the path to the OpenAPI spec file.
If you define the integration information, liblab accesses the OpenAPI spec when you run liblab build to create the enhancedApiSpec. By default, liblab search by openapi.json file at the root of the githubRepoName. However, if you specify the OpenAPI spec location using the readmeIO.openapiPath parameter, liblab will use this path to access the OpenAPI spec.
The following snippet provides the code to add to your liblab.config.json file.
{
  "integrations": {
    "enhancedApiSpec": {
      "provider": "readmeIO",
      "githubRepoName": "<your-repo-name>",
      "targetBranch": "main",
      "readmeIO": {
        "openapiPath": "petstore.json"
      }
    }
  }
}
Access the API documentation providers page for further information.
7.4 Set up the GitHub Tokens
To enable the liblab to make changes to the repository created in Step 2, you need to set the GitHub token as an environment variable. To do this, use the LIBLAB_GITHUB_TOKEN generated in Step 6.
Follow these steps:
-
Open a terminal and navigate to the root directory of the repository you created for the liblab project in Step 7.1.
-
Run the following command to export the token:
export LIBLAB_GITHUB_TOKEN=<your_token>
Once the token is exported, liblab will have the required permissions to push updates to the repository.
8. Building the New Documentation Version
After configuring the liblab project, you can build the project to generate the SDKs and the enhanced OpenAPI spec. To build the project, use the following command:
liblab build -y
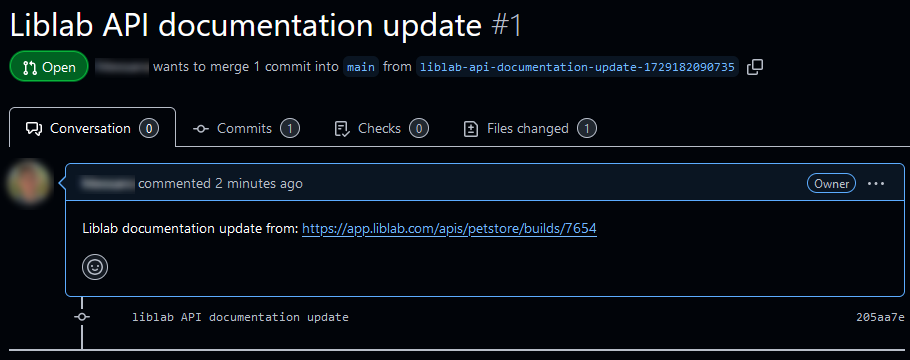
liblab will create a PR in your repository. A new branch called liblab-api-documentation-update-<Date> will be created for the pull request. This branch is based on the target branch you specified or on main if no branch was specified.
Once your enhanced API Spec has successfully been created and added to your repository, your terminal will display a message like the one below:
-ENHANCED API SPEC --------------------------------------
Creating a new branch for API documentation
Owner: <your-organization-name>
Repository: <your-repo-name>
Branch Name: liblab-api-documentation-update-1726770198377
Committing files to branch
git#push: Authenticating for: https://github.com/<your-organization-name>/<your-repo-name>.git
Successfully created PR for Enhanced API spec: https://github.com/<your-organization-name>/<your-repo-name>/pull/<pull-request-number>
You can access the PR and check the modified files using the link. In addition, you can merge the changes made by liblab into the main branch. The following image presents an example of the commit with the OpenAPI spec enhancements performed by liblab.
9. Access the New Documentation
After merging the PR, GitHub Actions will automatically trigger the ReadMe workflow, using the enhanced OpenAPI spec to generate and update your ReadMe API documentation.
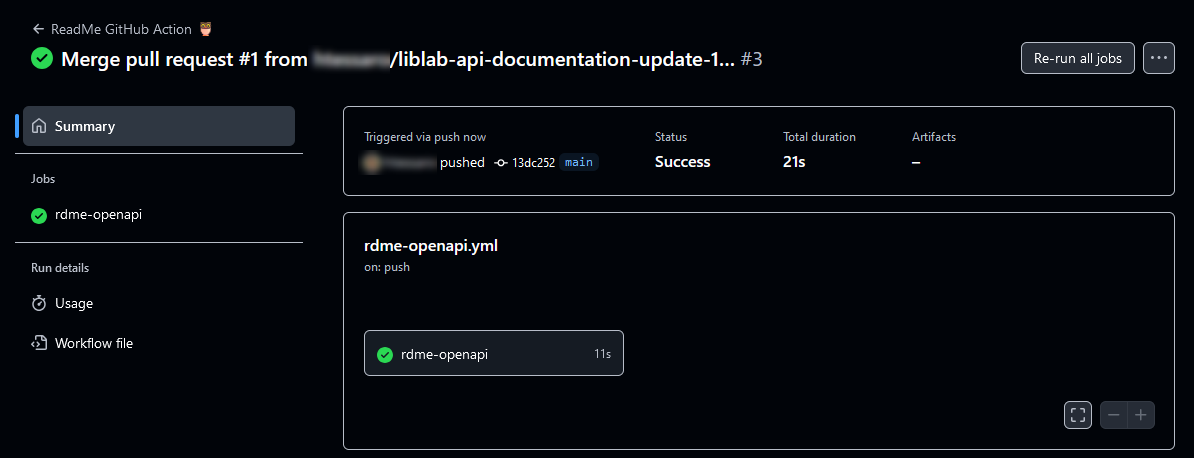
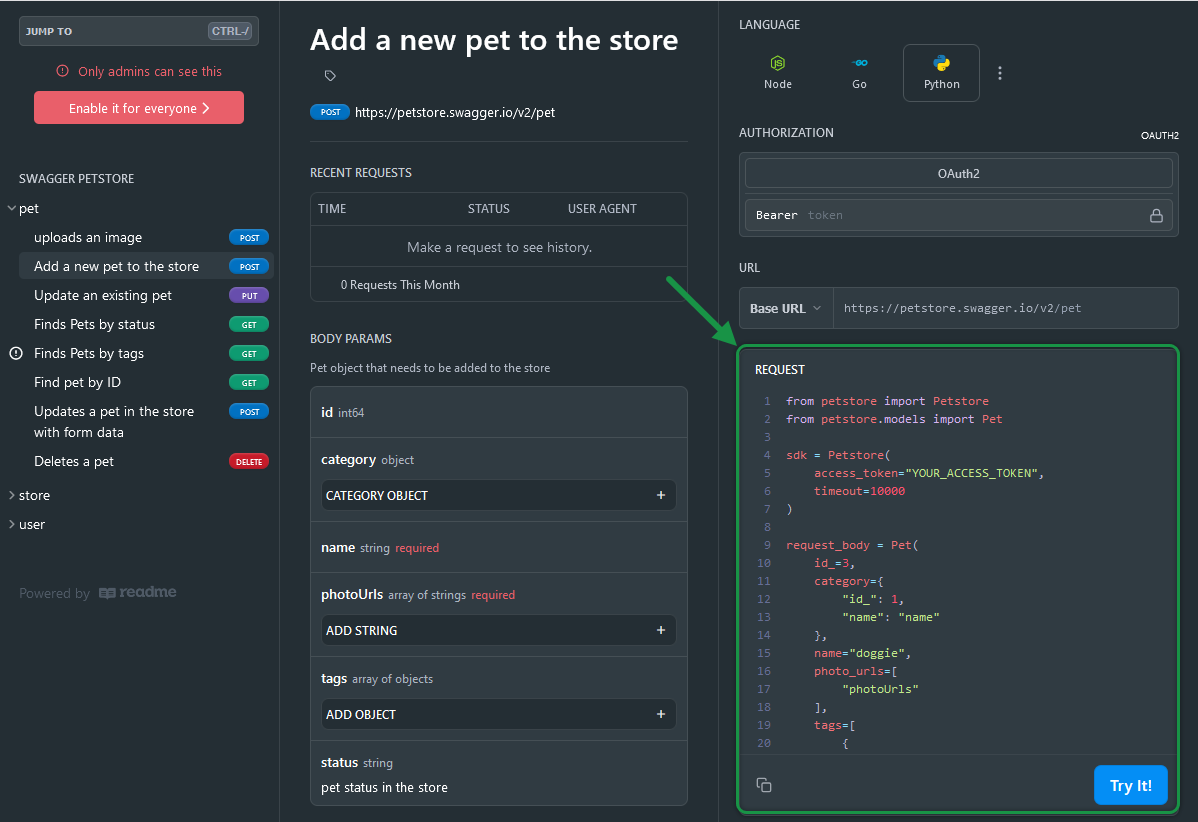
Access your ReadMe project to view the results of the OpenAPI spec enhancements made by liblab. Below is an example of the updated documentation using the enhanced PetStore API spec, which now includes SDK code samples for the programming languages generated by liblab, making it easier to test the API.
Conclusion
liblab's enhanced OpenAPI spec enables you to create robust, developer-centric documentation with SDK samples and code snippets that improve usability. The integration with ReadMe makes managing and updating your API documentation easier, keeping everything consistent. liblab is also working to support more API documentation tools, giving you more project options.