Redocly API docs integration
This tutorial will guide you through integrating Redocly with liblab to generate enhanced API documentation using the OpenAPI specification. With liblab, you can automate the process of updating your API documentation whenever your OpenAPI spec changes, reducing manual efforts.
API documentation providers like Redocly provide powerful tools to transform your OpenAPI spec into interactive, professional-grade documentation. With the liblab Redocly integration, you can enhance your API documentation by adding SDK code snippets that help developers quickly get up and running with API calls. These SDK snippets stay in sync with your API, ensuring a seamless and efficient developer experience.
In this tutorial, you will set up a repository, configure Redocly, and use libLab to enhance your API documentation with SDK code snippets, automating the update process for a seamless developer experience.
Prerequisites
- A liblab account.
- The liblab CLI installed.
- An OpenAPI spec.
1. Create a repository
To start, create a repository to host your Redocly project. You can do this with your GitHub account or organization. Clone the repository locally to add new files. For this tutorial, the repository is named redocly-demo.
2. Create a GitHub token
After creating the repository, generate a GitHub token to enable liblab to create pull requests (PRs) in your repository. This token ensures your redocly-demo repository's OpenAPI spec is updated automatically whenever you use liblab.
Follow these steps to create the token:
- Navigate to your GitHub profile and click Settings.
- In the sidebar, click Developer Settings.
- At the Developer Settings page, select Personal access tokens > Fine-grained tokens.
- Click Generate new token.
- Name the token LIBLAB_GITHUB_TOKEN and set its expiration. For production documentation, choose No expiration.
- Select Only select repositories under Repository Access and choose the redocly-demo repository.
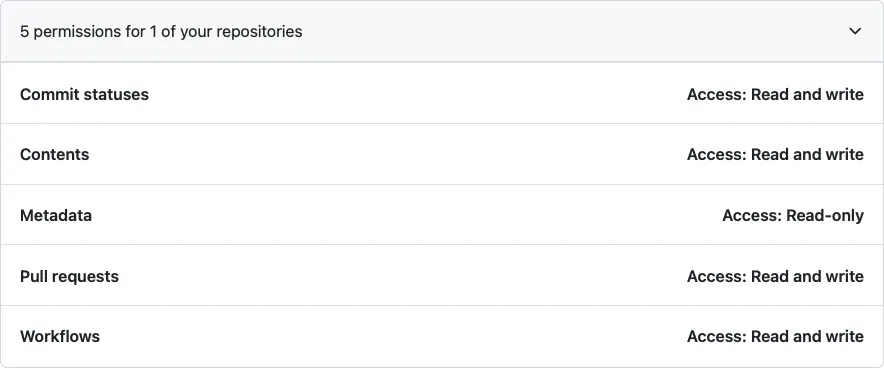
- Set the following repository permissions:
- Commit Statuses: Read/Write.
- Contents: Read/Write.
- Metadata: Read.
- Pull Requests: Read/Write.
- Workflows: Read/Write.
- Click Generate token.
Access the Pull request creation documentation page for further information and detailed guidance on creating the token.
Once created, copy the LIBLAB_GITHUB_TOKEN and save it in a secure location for use in the upcoming steps. For more details on how the LIBLAB_GITHUB_TOKEN will be used to create PRs, access the liblab documentation.
3. Install and use Redocly
Before using Redocly, install its CLI, which will help you build and preview the documentation from your OpenAPI spec. Run the following command to install it globally:
npm i -g @redocly/cli@latest
To generate a API documentation, Redocly CLI requires a redocly.yaml configuration file. This file defines how Redocly will generate the documentation. In your repository, created in Step 1, create a file named redocly.yaml with the following content:
apis:
  petstore:
    root: openapi/petstore.yaml
extends:
  - recommended
rules:
  no-unused-components: error
  no-server-example.com: off
theme:
  openapi:
    theme:
      colors:
        primary:
          main: "#32329f"
The above configuration specifies that the OpenAPI spec is located at ./openapi/petstore.yaml.
Ensure the API name specified in line 2 is consistent, as you'll use the same name when configuring liblab.
Access the Redocly documentation to see all available configurations you can use to generate the documentation from your OpenAPI spec.
This tutorial uses the PetStore API. Create the openapi/petstore.yaml file in your repository and add the PetStore API content to it. Your repository structure should look like this:
/redocly-demo
├── redocly.yaml
├── /openapi
    ├── petstore.yaml
Now that you have set the Redocly configurations and the OpenAPI spec, you can build the first version of your API documentation. To build the first version of your API documentation, run the following command from the repository root:
redocly build-docs
You should see a success message:
🎉 bundled successfully in: redoc-static.html
The redoc-static.html will be available in your repository. To preview the documentation, run the following command:
redocly preview-docs
The resulting documentation preview will be available at http://127.0.0.1:8080. The following image presents how the documentation for this tutorial should look like.

Once done, push your changes to GitHub.
4. Configure liblab project
Up to now, you've followed the standard process to create API documentation using Redocly. Now, you’ll integrate liblab to automatically update the OpenAPI specification in the repository created in Step 1.
liblab generates SDKs based on your OpenAPI spec and enhances the spec by adding elements like code snippets and SDK examples. These enhancements improve the developer experience by providing clear documentation. Integrating liblab makes your API documentation more dynamic, maintaining accuracy and consistency across every update with minimal manual effort.
Access the API and SDK documentation overview to learn more about how liblab enhances the OpenAPI spec.
4.1 Create the liblab project
In a new repository, initialize a liblab project with the following command:
liblab init
A new liblab.config.json file will be created in the directory. Update it to use the same OpenAPI spec as in Step 3:
{
  "sdkName": "petstore",
  "apiName": "petstore",
  "specFilePath": "https://raw.githubusercontent.com/OAI/OpenAPI-Specification/main/examples/v3.0/petstore.json"
}
Set the apiName to match the one used in Step 3. If the names don't match, liblab will face issues when generating the new OpenAPI spec in the subsequent steps.
By default, when you initialize a liblab project, it’s set to generate SDKs for the following programming languages:
- C#
- Go
- Python
- TypeScript
You can customize the list of programming languages as needed. However, keep in mind that the languages you specify in your liblab configuration file will be used to create the enhanced OpenAPI spec. This enhanced spec will include your OpenAPI definition along with SDK code snippets for each selected language. The enhanced OpenAPI spec will later be used to generate a new version of your API documentation with Redocly.
4.2 Set up the GitHub tokens
To enable the liblab to make changes to the repository created in Step 1, you need to set the GitHub token as an environment variable. To do this, use the LIBLAB_GITHUB_TOKEN generated in Step 2.
Follow these steps:
-
Open a terminal and navigate to the root directory of the repository you created for the liblab project in Step 4.1.
-
Run the following command to export the token:
export LIBLAB_GITHUB_TOKEN=<your_token>
Once the token is exported, liblab will have the required permissions to push updates to the repository.
4.3 Configure the GitHub Organization
To ensure liblab pushes changes to the correct repository after enhancing the API, you need to update the liblab.config.json file with the organization or username that owns the repository created in Step 1. Add the following to your liblab.config.json file:
{
  "publishing": {
    "githubOrg": "<your-organization-name>"
  }
}
If you own the repository from Step 1, use your GitHub username as the githubOrg.
4.4 Configure integration setting
In addition to specifying the organization, you must also configure the integration for generating the API documentation. This information should be placed within the integrations.enhancedApiSpec object. Access Update the liblab.config.json file with the following information:
provider: The API documentation provider, which for this tutorial isredocly.githubRepoName: The GitHub repository where the API documentation project is hosted. Use the repository created in Step 1 for this tutorial, namedredocly-demo.targetBranch: The branch where liblab should create pull requests. By default, this is set to themainbranch.redocly.openapiPath(Optional): This object allows you to specify the path to the OpenAPI spec file. If theopenapiPathis specified, it overrides the path provided in theredocly.yamlfile.
If you define the integration information, liblab accesses the OpenAPI spec when you run liblab build to create the enhancedApiSpec.It locates the original OpenAPI spec based on the redocly.yaml file content in the specified githubRepoName. However, if you specify the OpenAPI spec location using the redocly.openapiPath parameter, liblab will bypass the redocly.yaml file and access the spec directly. This option is useful for documentation projects that don't use a redocly.yaml file.
The following snippet provides the code to add to your liblab.config.json file. Note that the path to the OpenAPI spec isn't provided. Therefore, the path specified in the redocly.yaml file will be used.
{
  "integrations": {
    "enhancedApiSpec": {
      "provider": "redocly",
      "githubRepoName": "redocly-demo",
      "targetBranch": "main",
    }
  }
}
Access the API documentation providers page for further information.
5. Enhance the OpenAPI
After configuring the liblab project, you can build the project to generate the SDKs and the enhanced OpenAPI spec. To build the project, use the following command:
liblab build -y
liblab will create a PR in your repository. A new branch called liblab-api-documentation-update-<Date> will be created for the pull request. This branch is based on the target branch you specified or on main if no branch was specified.
Once your enhanced API Spec has successfully been created and added to your repository, your terminal will display a message like the one below:
-ENHANCED API SPEC --------------------------------------
Creating a new branch for API documentation
Owner: <your-organization-name>
Repository: redocly-demo
Branch Name: liblab-api-documentation-update-1726770198377
Committing files to branch
git#push: Authenticating for: https://github.com/<your-organization-name>/redocly-demo.git
Successfully created PR for Enhanced API spec: https://github.com/<your-organization-name>/redocly-demo/pull/<pull-request-number>
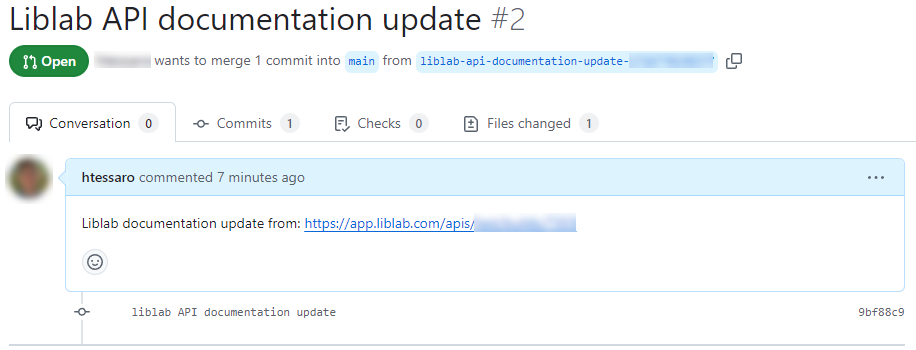
You can access the PR and check the modified files using the link. In addition, you can merge the changes made by liblab into the main branch. The following image presents an example of the commit with the OpenAPI spec enhancements performed by liblab.
6. Accessing the new documentation
To check the updated documentation based on the enhanced OpenAPI spec, you can either access the new branch (liblab-api-documentation-update-<Date>) or merge the PR created in Step 5. In this tutorial, we assume you've merged the PR into the main branch.
First, pull the latest changes from the main branch to your local machine. Then, run the following command to build the updated documentation using Redocly:
redocly build-docs
Once the build is complete, the redoc-static.html file will be available in your repository. To view the generated documentation, run:
redocly preview-docs
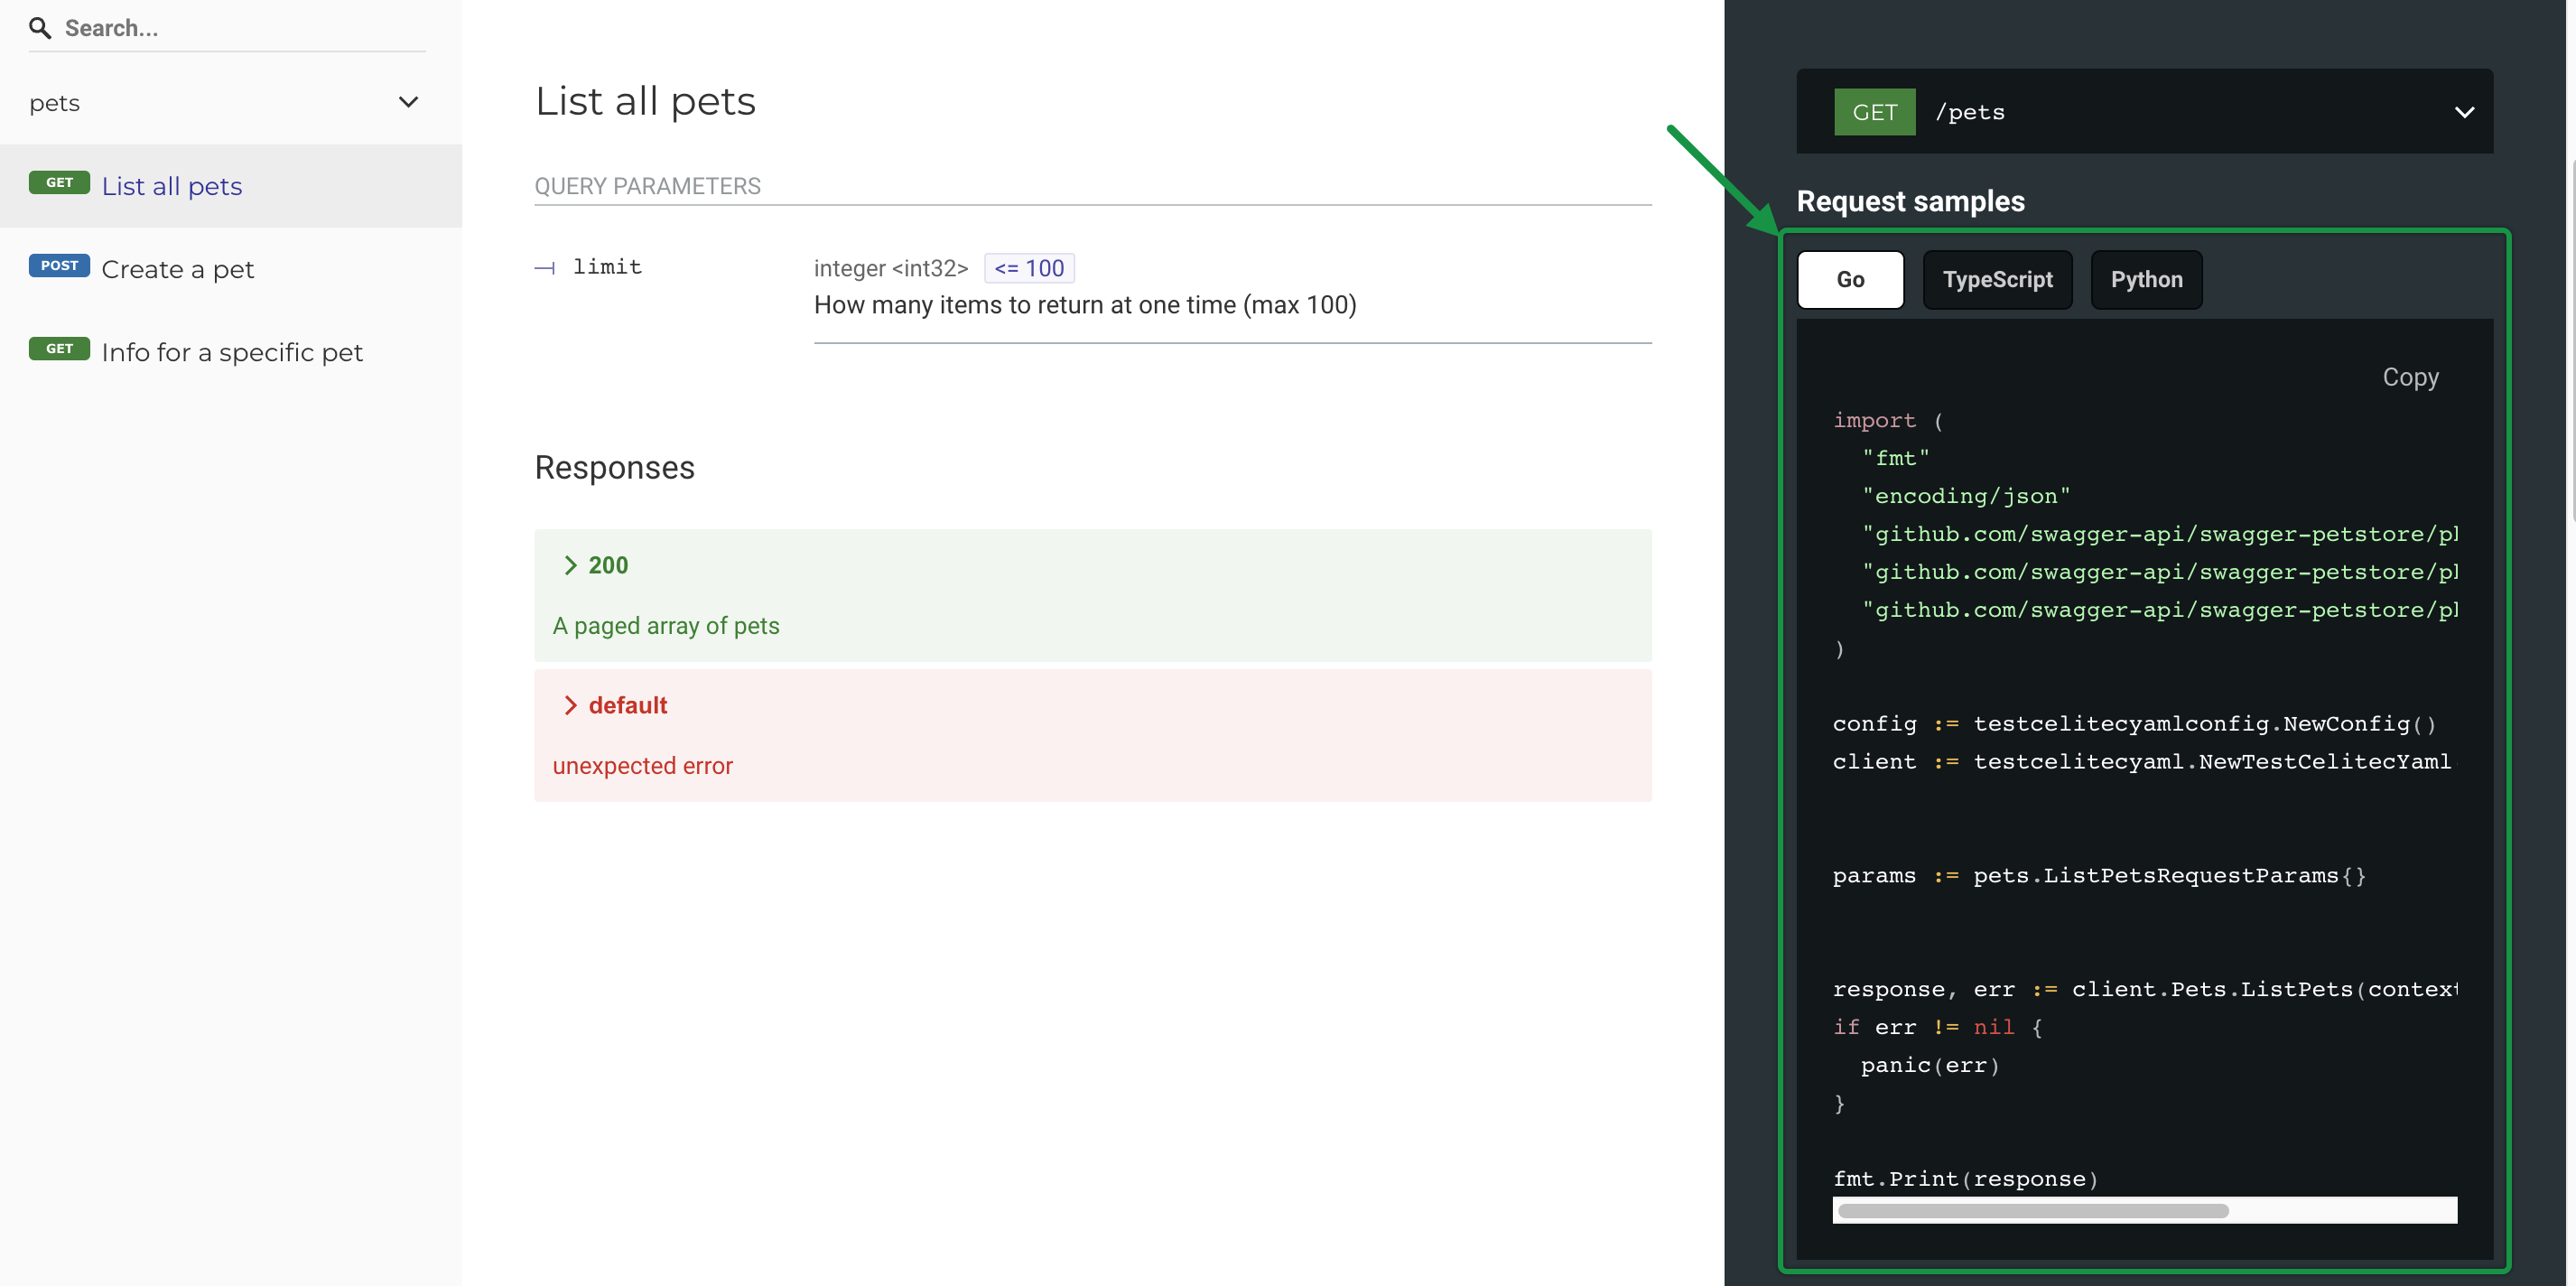
The documentation will be available at http://127.0.0.1:8080. When you open the preview, you will see the results of the OpenAPI spec enhancements made by liblab. Below is an example of the updated documentation, which includes request samples for all the programming languages supported by the SDKs generated by liblab, providing an easy way to test the API. The request samples available depend on the programming languages selected in the liblab.config.json file.
Conclusion
With liblab's enhanced OpenAPI spec, you have dynamic and developer-friendly documentation, complete with SDK examples and code snippets to improve the developer experience. The direct integration with Redocly simplifies the documentation process and helps maintain consistency across your API projects. liblab is constantly working to expand the number of API documentation providers supported.